Inorrect wheel alignment leads to faster and uneven tyre wear, unbalanced wheels and heavier steering. The larger diameter wheels of Series Land Rovers, relative to many cars, means that these tell-tale effects go unnoticed for longer.
Commercial wheel alignment checks and subsequent adjustment are the best way to go. However, self-diagnosis has a place, because checks can be carried out as frequently as you wish, at no cost. This is an important factor, as off-road driving is a prime possible cause of wheel alignment problems. We don't often feel obliged to check wheel alignment after each vigorous off-road activity, yet ideally we should do so.
Keeping a Series Land Rover on the road these days is becoming increasingly expensive so this months homepage is designed to help reduce some costs.
 Many of us already have a simple tyre depth gauge as shown in the photo (above). They are frequently supplied with other car accessories such as tyre pumps. The DIY alignment tool simply consists of a securely mounted gauge at the end of some sort of rigid and straight probe.
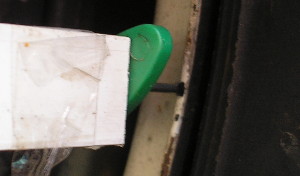
The photo (above) shows a standard plastic electric conduit - the sort that has a snap-on cover. The gauge is inserted upto its shoulder and is taped over to prevent movement. Another possibility is to drill a suitable sized hole in a wooden dowel or lath and insert the gauge into it. Innovation is the mother of invention, so look around to see what you have available to do the same job. Rigidity is important though. You may well be able to modify the tool design to enable you to read the gauge without having to remove it first.
The tool should be cut to the length corresponding to the distance between the inside edges of the front wheel rims. The down side of the tool is that is will only be usable on a Series Land Rover, though the principle can be used to construct a similar tool for any car. It is important to have the gauge itself set to about half extension when the tool is cut to size, otherwise insufficient adjustment will be available.
To use the tool, set the non-gauge end of the tool firmly against the front edge of the wheel rim at mid height of the rim (photo below).
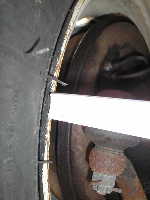
Standard rims for a Series Land Rover have good protruding edges that the tool can be located on. Adjust the gauge to touch the opposite wheel rim at the same height (photo below).
Carefully remove the tool, detach the gauge and read the depth in mm.
Repeat the process between the
middle rear edges of the same wheel rims. There should be an increase in the gauge reading of not less than 1mm and not more than 2.5mm. If there is no increase in reading, or even a decrease, then the wheels are in a toe-out configuration instead of toe-in. If the increase exceeds 2.5mm then the toe-in is too much. All standard SWB & LWB Series I,II,IIA & III Land Rovers have the same toe-in measurements.
************************
(To see previous homepages visit the Homepage Archives link)
**************************
